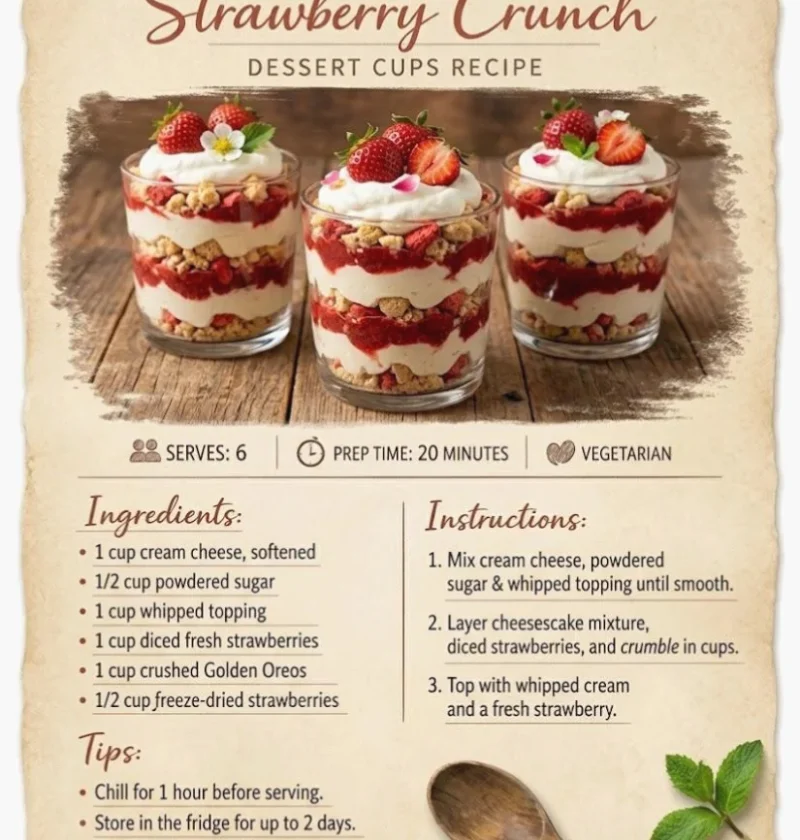
Are you searching for a delightful treat that requires no baking and is perfect for any occasion? Look no further than these Easy No-Bake Crunch Dessert Cups. This simple yet satisfying dessert combines creamy textures with crunchy elements, making it a hit with both kids and adults. Perfect for summer gatherings, picnics, or as a quick after-school snack, these dessert cups are sure to please anyone with a sweet tooth! With their vibrant colors and layered presentations, they are not only delicious but also visually stunning.
Ingredients
Gather the following ingredients to create your Easy No-Bake Crunch Dessert Cups. Ensure you have everything on hand before you start for a smooth preparation process. You can learn more about this topic. For best results, choose high-quality ingredients, especially for the cream cheese and whipped cream, as they greatly enhance the flavor and texture of the dessert.
- Creamy Layer:
- 8 oz (225g) cream cheese, softened to room temperature for easy mixing
- 1 cup powdered sugar, sifted if clumpy for a smooth finish
- 1 teaspoon vanilla extract, for a rich, aromatic flavor
- 1 cup whipped cream or whipped topping, which adds lightness and volume
- Crunchy Layer:
- 1 cup granola (choose your favorite variety, such as honey, maple, or chocolate granola, for added flavor)
- ½ cup crushed nuts (such as almonds or pecans), which provide a delightful crunch
- 1 cup mini chocolate chips, for that sweet bite in every spoonful
- Toppings:
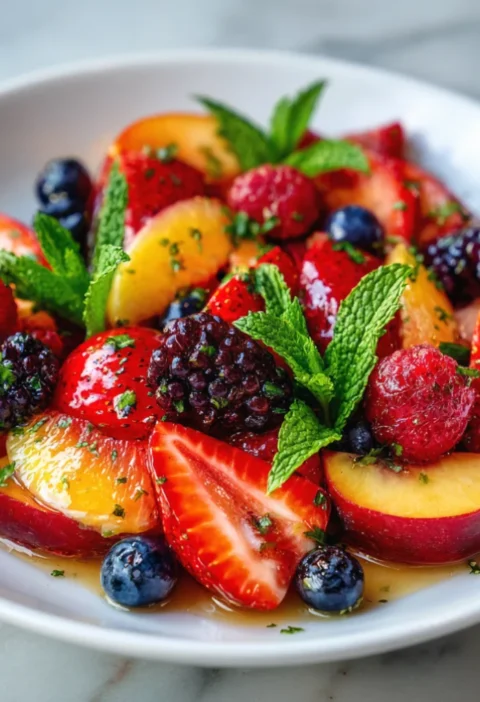
- Fresh berries (e.g., strawberries, blueberries, or raspberries), which add a burst of color and freshness
- Drizzle of chocolate syrup, to enhance the dessert’s sweetness and visual appeal
- Additional granola for garnish, providing extra texture and a charming finish
Note: For a vegan option, substitute cream cheese with a plant-based alternative and use a dairy-free whipped topping. Check out our related guide for more tips on making this dessert accessible to everyone.
Steps / Instructions
Follow these straightforward steps to whip up your Easy No-Bake Crunch Dessert Cups:
- In a mixing bowl, beat the softened cream cheese using an electric mixer until smooth and creamy, which usually takes about 2 minutes.
- Gradually add the powdered sugar and vanilla extract, mixing until fully incorporated and the mixture is fluffy, which should take an additional 1-2 minutes.
- Gently fold in the whipped cream until the mixture is light and airy. This will create a delicious, creamy layer that contrasts beautifully with the crunchy elements. Take care not to deflate the whipped cream too much.
- In a separate bowl, combine the granola, crushed nuts, and mini chocolate chips. This will be your crunchy layer, and feel free to mix it well for even distribution of ingredients.
- To assemble, start by layering the creamy mixture at the bottom of each dessert cup, filling them about halfway. Use a spoon or spatula to create an even layer.
- Add a generous layer of the crunchy mixture on top of the creamy layer, pressing down lightly to secure it in place without compacting it too much.
- Repeat the layers until you reach the top of the cups, finishing with a creamy layer for a polished look.
- Refrigerate the dessert cups for at least 2 hours, allowing them to set and the flavors to meld together. This chilling time ensures they hold their shape when served.
- Before serving, top each cup with fresh berries, a drizzle of chocolate syrup, and a sprinkle of extra granola for added texture. This final touch not only enhances the taste but also makes them more visually appealing.
Tips & Tricks
To ensure your Easy No-Bake Crunch Dessert Cups turn out perfectly, consider the following tips:
- Storage: These dessert cups can be stored in the refrigerator for up to 3 days. Cover them with plastic wrap or a lid to maintain freshness and prevent them from absorbing other odors from the fridge.
- Make-Ahead: You can prepare the creamy and crunchy layers a day in advance, storing them separately in the refrigerator. Assemble the cups on the day you plan to serve them for maximum freshness and the best texture.
- Avoiding Common Mistakes: Make sure the cream cheese is thoroughly softened to prevent lumps in the creamy layer. Also, do not overmix the whipped cream; gently folding is key for a light texture that makes the dessert enjoyable.
- Pro Technique: For a more sophisticated look, use a piping bag to layer the creamy mixture into the cups. This gives a beautiful finish and even distribution of layers that elevates the overall presentation.
Variations
If you want to switch things up, consider the following variations for your Easy No-Bake Crunch Dessert Cups:
- Flavor Variations: Experiment with flavored extracts like almond or lemon for the creamy layer. You could also add a layer of fruit puree for an added burst of flavor, such as raspberry or mango puree.
- Dietary Alternatives: For a gluten-free option, ensure the granola and any nuts used are certified gluten-free. Replace the sugar with a natural sweetener like maple syrup or agave nectar for a healthier twist without sacrificing taste.
- Ingredient Swaps: Instead of nuts, consider using seeds like pumpkin or sunflower seeds for a nut-free option. You could also try adding shredded coconut to the crunchy layer for added flavor and texture.
Serving Suggestions
For a delightful presentation, serve the Easy No-Bake Crunch Dessert Cups in clear glass cups or jars to showcase the beautiful layers. Pair with a refreshing beverage like lemonade or iced tea for a complete summer experience. These cups make for a delightful picnic dessert, especially when accompanied by fresh fruit or a light salad. Consider placing them on a decorative tray for an appealing display, especially when serving guests.
These Easy No-Bake Crunch Dessert Cups are not only a treat for the taste buds but also visually appealing, making them perfect for any gathering or a sweet indulgence at home! They are sure to be a highlight at any event, drawing the attention of dessert lovers everywhere.
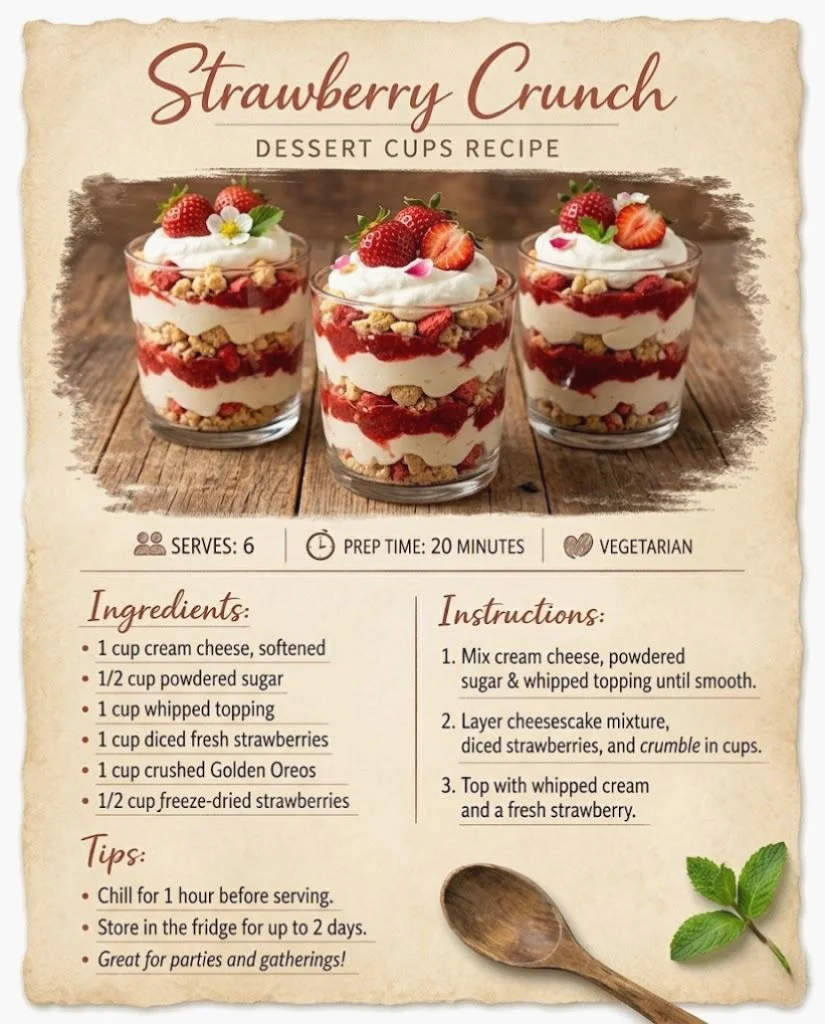
Easy No-Bake Crunch Dessert Cups
A delightful treat that requires no baking and is perfect for any occasion. This dessert combines creamy textures with crunchy elements, making it a hit with both kids and adults.
Ingredients
- 8 oz (225g) cream cheese, softened to room temperature
- 1 cup powdered sugar, sifted if clumpy
- 1 teaspoon vanilla extract
- 1 cup whipped cream or whipped topping
- 1 cup granola
- ½ cup crushed nuts (such as almonds or pecans)
- 1 cup mini chocolate chips
- Fresh berries (e.g., strawberries, blueberries, or raspberries)
- Drizzle of chocolate syrup
- Additional granola for garnish
Directions
In a mixing bowl, beat the softened cream cheese using an electric mixer until smooth and creamy, which usually takes about 2 minutes.
Gradually add the powdered sugar and vanilla extract, mixing until fully incorporated and the mixture is fluffy, which should take an additional 1-2 minutes.
Gently fold in the whipped cream until the mixture is light and airy.
In a separate bowl, combine the granola, crushed nuts, and mini chocolate chips.
To assemble, layer the creamy mixture at the bottom of each dessert cup, filling them about halfway.
Add a generous layer of the crunchy mixture on top of the creamy layer, pressing down lightly.
Repeat the layers until you reach the top of the cups, finishing with a creamy layer.
Refrigerate the dessert cups for at least 2 hours.
Before serving, top each cup with fresh berries, a drizzle of chocolate syrup, and a sprinkle of extra granola.
Recipe Reviews
- ★★★★★
Excellent recipe!
Leave a Reply
Your email address will not be published. Required fields are marked *