If you’re looking to bring a taste of the tropics to your dessert table, the Pineapple Coconut Cheesecake is a delightful choice. This creamy, no-bake cheesecake perfectly balances the sweet tang of pineapple with the rich flavor of coconut, making it an ideal summer treat or a festive addition to any gathering. With a simple ingredient list and straightforward instructions, you’ll whip up this refreshing dessert in no time. The combination of flavors is not only delicious but also visually appealing, turning any occasion into a special event.
Ingredients
- For the Crust:
- 1 ½ cups graham cracker crumbs (preferably made from a brand without high fructose corn syrup)
- ½ cup unsweetened shredded coconut (look for fresh or high-quality dried coconut)
- ½ cup unsalted butter, melted (using unsalted allows you to control the sweetness)
- ¼ cup granulated sugar (you can also substitute with brown sugar for a richer taste)
- For the Cheesecake Filling:
- 16 oz cream cheese, softened (bring it to room temperature for easier blending)
- 1 cup powdered sugar (sifted to remove any lumps for smoothness)
- 1 cup coconut cream (or coconut milk, depending on creaminess desired)
- 1 tsp vanilla extract (pure vanilla extract offers the best flavor)
- 1 cup crushed pineapple, drained (ensure it’s well-drained to avoid excess moisture)
- 1 cup heavy whipping cream (chilled for best results when whipping)
- For Topping:
- ½ cup fresh pineapple chunks (use ripe pineapple for the best sweetness)
- ¼ cup toasted coconut flakes (toasting enhances the flavor; watch carefully to avoid burning)
- Mint leaves for garnish (optional, but adds a fresh touch and color)
Steps / Instructions
- Prepare the Crust: In a mixing bowl, combine the graham cracker crumbs, shredded coconut, melted butter, and granulated sugar. Mix until all ingredients are well blended and resemble wet sand. This step creates a flavorful foundation for your cheesecake.
- Form the Crust: Press the mixture firmly into the bottom of a 9-inch springform pan, ensuring an even layer. Use the back of a measuring cup to compact it tightly. A well-formed crust provides stability and a perfect texture once set.
- Chill the Crust: Place the crust in the refrigerator for at least 30 minutes to set while you prepare the filling. This step is crucial as it allows the butter to solidify, which prevents the crust from crumbling later.
- Make the Cheesecake Filling: In a large bowl, beat the softened cream cheese with an electric mixer until smooth and creamy, about 2-3 minutes. This ensures that your filling will be rich and velvety without lumps.
- Add Sweetness: Gradually add the powdered sugar, continuing to beat until fully incorporated and smooth. This addition of sweetness balances the tanginess of the pineapple beautifully.
- Add Coconut and Vanilla: Pour in the coconut cream and vanilla extract. Mix until well combined. The coconut cream contributes to the signature tropical flavor of the Pineapple Coconut Cheesecake, making it irresistible.
- Incorporate Pineapple: Gently fold in the crushed pineapple until evenly distributed throughout the cheesecake mixture. Ensure that the pineapple is thoroughly mixed but be careful not to overmix to maintain the lightness of the filling.
- Whip Cream: In another bowl, whip the heavy cream until stiff peaks form. This adds lightness to the cheesecake, creating a fluffy texture that contrasts beautifully with the creamy filling.
- Combine Mixtures: Fold the whipped cream into the cream cheese mixture gently, being careful not to deflate the whipped cream. This step is important for achieving the cheesecake’s light and airy consistency.
- Fill the Crust: Pour the cheesecake filling into the prepared crust, smoothing the top with a spatula. Take your time to create a nice, even surface; this will make for a beautiful presentation.
- Chill Again: Cover the cheesecake and refrigerate it for at least 4 hours, or until it is fully set. Overnight is ideal for the best texture. This waiting period allows the flavors to meld and the filling to firm up.
- Prepare to Serve: Once set, remove the cheesecake from the springform pan. Top with fresh pineapple chunks and toasted coconut flakes just before serving. This adds color and a tropical flair, making your dessert even more inviting.
Tips & Tricks
To achieve the best results with your Pineapple Coconut Cheesecake, consider the following tips: You can learn more about this topic.
- Ingredient Quality: Use high-quality cream cheese and coconut cream for a richer flavor. Full-fat ingredients yield the best texture, ensuring your cheesecake is creamy and decadent.
- Crust Texture: Ensure your crust is well packed; this prevents it from crumbling when slicing the cheesecake. A firm crust is key to a successful cheesecake presentation.
- Make-Ahead: This cheesecake can be made a day in advance, making it a fantastic option for parties and gatherings. The flavors improve as they meld overnight, resulting in a tastier dessert.
- Storage: Keep leftovers covered in the refrigerator for up to 5 days. The cheesecake can also be frozen for up to 2 months—thaw in the fridge before serving. Proper storage maintains the cheesecake’s texture and flavor.
- Common Mistakes: Avoid overmixing the whipped cream, as it can lead to a dense filling instead of a light texture. Additionally, make sure to not skip the chilling steps; they are essential for achieving the right consistency.
- Presentation: For a tropical flair, garnish with edible flowers or serve with a side of tropical fruit salad. This not only enhances the aesthetic but also complements the flavors of the cheesecake.
Variations
If you want to customize your pineapple coconut cheesecake, consider these options: Check out our related guide for more tips.
- Flavor Twist: Incorporate other tropical fruits such as mango or passion fruit for added flavor. This can create exciting new taste combinations that elevate your cheesecake.
- Vegan Option: Substitute cream cheese with a vegan alternative and use coconut whipped cream instead of heavy cream. This allows everyone to enjoy this delightful dessert, regardless of dietary restrictions.
- Gluten-Free Crust: Use gluten-free graham crackers or ground nuts to make the crust suitable for gluten-sensitive guests. This ensures that all your guests can enjoy the deliciousness of the Pineapple Coconut Cheesecake.
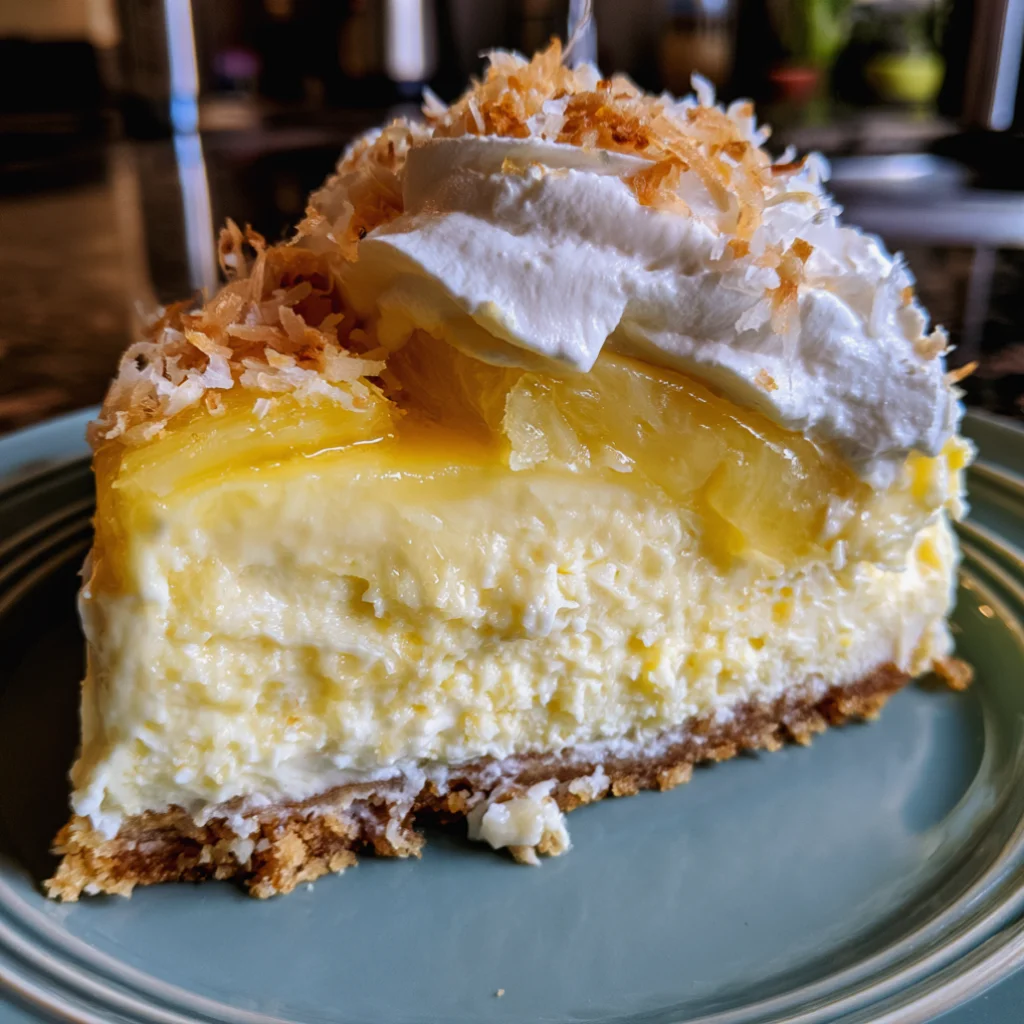
Pineapple Coconut Cheesecake
This creamy, no-bake cheesecake perfectly balances the sweet tang of pineapple with the rich flavor of coconut, making it an ideal summer treat or a festive addition to any gathering.
Ingredients
- For the Crust:
- 1 ½ cups graham cracker crumbs
- ½ cup unsweetened shredded coconut
- ½ cup unsalted butter, melted
- ¼ cup granulated sugar
- For the Cheesecake Filling:
- 16 oz cream cheese, softened
- 1 cup powdered sugar
- 1 cup coconut cream
- 1 tsp vanilla extract
- 1 cup crushed pineapple, drained
- 1 cup heavy whipping cream, chilled
- For Topping:
- ½ cup fresh pineapple chunks
- ¼ cup toasted coconut flakes
- Mint leaves for garnish (optional)
Directions
In a mixing bowl, combine the graham cracker crumbs, shredded coconut, melted butter, and granulated sugar. Mix until well blended.
Press the mixture firmly into the bottom of a 9-inch springform pan.
Place the crust in the refrigerator for at least 30 minutes to set.
In a large bowl, beat the softened cream cheese with an electric mixer until smooth and creamy.
Gradually add the powdered sugar, beating until fully incorporated and smooth.
Pour in the coconut cream and vanilla extract. Mix until well combined.
Gently fold in the crushed pineapple until evenly distributed.
In another bowl, whip the heavy cream until stiff peaks form.
Fold the whipped cream into the cream cheese mixture gently.
Pour the cheesecake filling into the prepared crust, smoothing the top.
Cover the cheesecake and refrigerate it for at least 4 hours, or until it is fully set.
Once set, remove the cheesecake from the springform pan. Top with fresh pineapple chunks and toasted coconut flakes just before serving.
Nutrition Facts
Recipe Reviews
- ★★★★★
Excellent recipe!
Leave a Reply
Your email address will not be published. Required fields are marked *