Introduction
Imagine a dessert that requires no baking, minimal effort, and results in a heavenly treat that will have your taste buds dancing with delight. Enter the Oreo IceBox Cake – a decadent and irresistible confection that combines the iconic flavors of Oreo cookies with creamy goodness. This no-bake dessert is not only easy to make but also delivers a delightful experience with every bite.
Originating from the concept of an icebox cake, where layers of cookies and cream are chilled together to create a harmonious dessert, the Oreo IceBox Cake takes this classic idea to a whole new level. It is a perfect blend of nostalgia and modern indulgence, making it a favorite among both kids and adults alike.
Whether you’re hosting a gathering, celebrating a special occasion, or simply craving a sweet treat, this Oreo IceBox Cake is sure to satisfy your dessert cravings. So, roll up your sleeves, grab your ingredients, and let’s embark on a delightful culinary journey!
Get ready to experience the magic of Oreo cookies in a whole new way as we dive into the world of this delectable Oreo IceBox Cake recipe.
Why You’ll Love This Recipe
What makes the Oreo IceBox Cake so special? Let’s uncover the reasons why this dessert has captured the hearts and taste buds of so many dessert enthusiasts:
First and foremost, this recipe is incredibly easy to make, requiring no baking skills or fancy equipment. With just a few simple steps, you can create a stunning dessert that looks and tastes like it was made by a professional pastry chef.
Additionally, the Oreo IceBox Cake offers a perfect balance of flavors and textures. The crunch of the Oreo cookies against the smooth and creamy filling creates a delightful contrast that will keep you coming back for more.
Furthermore, this recipe can be easily customized to suit your preferences. Whether you want to add extra layers of cookies, drizzle chocolate sauce on top, or incorporate different flavored Oreo cookies, the possibilities for personalization are endless.
Lastly, this dessert is a crowd-pleaser. From children to adults, everyone loves the familiar taste of Oreo cookies, making this IceBox Cake a hit at parties, potlucks, or even as a special weeknight treat.
Now that you know why this recipe is a must-try, let’s gather our ingredients and get ready to create a dessert that will leave a lasting impression on your taste buds.
Ingredients
Before we embark on our Oreo IceBox Cake adventure, let’s gather all the ingredients we’ll need for this delightful dessert:
– 1 package of Oreo cookies (regular or flavored, depending on your preference)
– 1 1/2 cups of cold milk
– 1 package of instant vanilla pudding mix
– 2 cups of whipped cream
– Optional: chocolate sauce, sprinkles, or additional Oreo cookies for garnish
Feel free to explore different variations by using flavored Oreo cookies or experimenting with different pudding mix flavors to create a unique twist on this classic recipe. Let your creativity shine as you gather these simple yet essential ingredients.
With our ingredients in hand, we are now ready to dive into the step-by-step instructions to create our delicious Oreo IceBox Cake.
Step-by-Step Instructions
Creating the Oreo IceBox Cake is a breeze, thanks to its simple assembly process. Follow these easy steps to whip up a dessert that will wow your family and friends:
1. In a mixing bowl, combine the cold milk and instant vanilla pudding mix. Whisk together until the mixture thickens, then gently fold in the whipped cream to create a smooth and creamy filling.
2. In a separate bowl, crush the Oreo cookies into coarse crumbs using a food processor or by placing them in a sealed plastic bag and crushing them with a rolling pin.
3. To assemble the cake, start by spreading a layer of the pudding and cream mixture at the bottom of a casserole dish or cake pan. Follow this with a generous sprinkle of crushed Oreo cookies to create the first layer.
4. Continue layering the pudding mixture and crushed cookies until you reach the top of the dish, ensuring that the final layer is the pudding mixture. Smooth out the top with a spatula for a clean finish.
5. Cover the dish with plastic wrap and refrigerate the Oreo IceBox Cake for at least 4 hours, allowing the flavors to meld together and the cake to set properly.
6. Before serving, you can garnish the cake with a drizzle of chocolate sauce, a sprinkle of cookie crumbs, or additional whole Oreo cookies for a decorative touch.
Now that our Oreo IceBox Cake is chilling in the fridge, let’s explore some expert tips to ensure that your dessert turns out perfectly every time.
Expert Tips for Success
For those looking to elevate their Oreo IceBox Cake game, here are some expert tips to help you achieve dessert perfection:
– Use chilled bowls and utensils when whipping the cream to ensure a light and fluffy texture.
– Allow the cake to set in the refrigerator for the full recommended time to ensure that it holds its shape when sliced.
– Experiment with different Oreo cookie flavors to create unique variations of the classic recipe.
– For a richer filling, you can substitute part of the whipped cream with cream cheese for a tangy twist.
– Serve the Oreo IceBox Cake chilled for the best taste and texture.
By following these expert tips, you’ll be on your way to creating a show-stopping Oreo IceBox Cake that will impress your guests and leave them craving more.
Variations and Substitutions
While the classic Oreo IceBox Cake is a delightful dessert on its own, there are endless possibilities for customizing this recipe to suit your tastes and preferences:
– Swap out the vanilla pudding mix for chocolate or cookies and cream flavors to add a twist to the filling.
– Experiment with different Oreo cookie flavors, such as mint, peanut butter, or red velvet, to create unique flavor combinations.
– For a dairy-free version, you can use coconut whipped cream and a plant-based milk alternative to make this dessert suitable for vegan diets.
– Add layers of fresh berries or sliced bananas between the cookie and cream layers for a fruity addition to the cake.
– Drizzle caramel sauce or peanut butter sauce on top of the cake for an extra indulgent finish.
Feel free to get creative in the kitchen and tailor this recipe to your liking. The Oreo IceBox Cake is a versatile dessert that welcomes experimentation and innovation.
Serving Suggestions
When it comes to serving the Oreo IceBox Cake, there are several ways to enhance the experience and delight your guests:
– Serve chilled slices of the cake with a dollop of whipped cream and a dusting of cocoa powder for an elegant presentation.
– Pair the dessert with a scoop of vanilla ice cream or a drizzle of hot fudge sauce for a decadent treat.
– Accompany the Oreo IceBox Cake with a cup of freshly brewed coffee or a glass of cold milk for a classic dessert pairing.
– For a special occasion, garnish the cake with edible flowers or chocolate shavings to add a touch of elegance to the presentation.
However you choose to serve this delectable dessert, one thing is certain – it will be a hit with everyone who takes a bite.
FAQs
As you prepare to create your own Oreo IceBox Cake masterpiece, you may have some burning questions. Here are a few common queries and their answers to help you along your baking journey:
Q: Can I make this recipe ahead of time?
A: Yes, the Oreo IceBox Cake is ideal for making ahead of time, as it needs to chill in the refrigerator for a few hours before serving.
Q: How long will the Oreo IceBox Cake last in the fridge?
A: The cake can be stored in the refrigerator for up to 2-3 days, but it is best enjoyed within the first day or two for optimal freshness.
Q: Can I freeze the Oreo IceBox Cake?
A: While the cake can be frozen, the texture may change slightly upon thawing, so it is best enjoyed fresh.
Q: Can I use homemade whipped cream instead of store-bought?
A: Absolutely! Homemade whipped cream can be used in place of store-bought for a fresher and more customized flavor profile.
With these FAQs answered, you are now equipped with the knowledge to tackle any challenges that may arise during the Oreo IceBox Cake-making process.
Final Thoughts
As we reach the end of our Oreo IceBox Cake journey, I hope you are inspired to try this delightful recipe for yourself. From its simple preparation to its irresistible flavors, this dessert is a true crowd-pleaser that will bring joy to any occasion.
So, gather your ingredients, follow the step-by-step instructions, and don’t forget to add your creative flair to make this Oreo IceBox Cake your own. Whether you’re a seasoned baker or a novice in the kitchen, this recipe is sure to impress and satisfy your sweet cravings.
Thank you for joining me on this culinary adventure. Now, it’s time to indulge in the deliciousness of the Oreo IceBox Cake – a dessert that is as easy to make as it is to love.
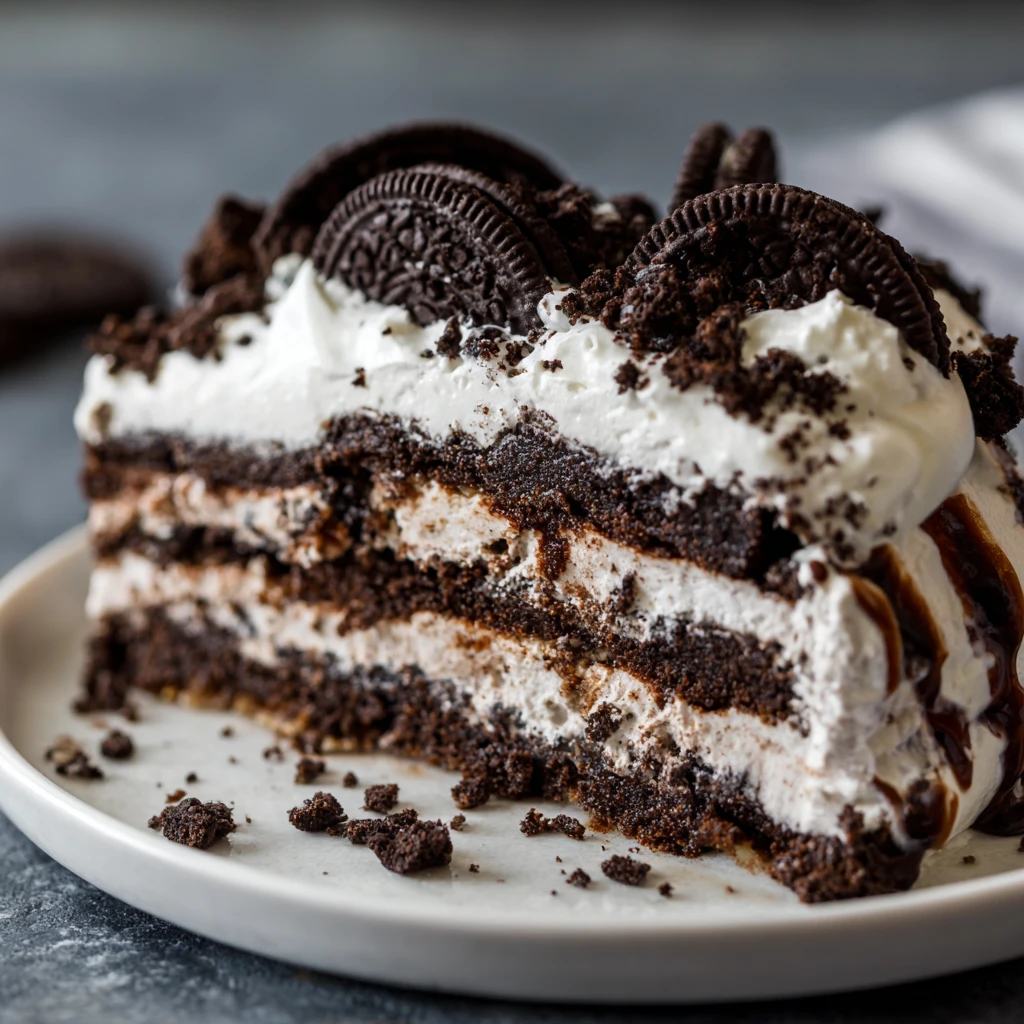
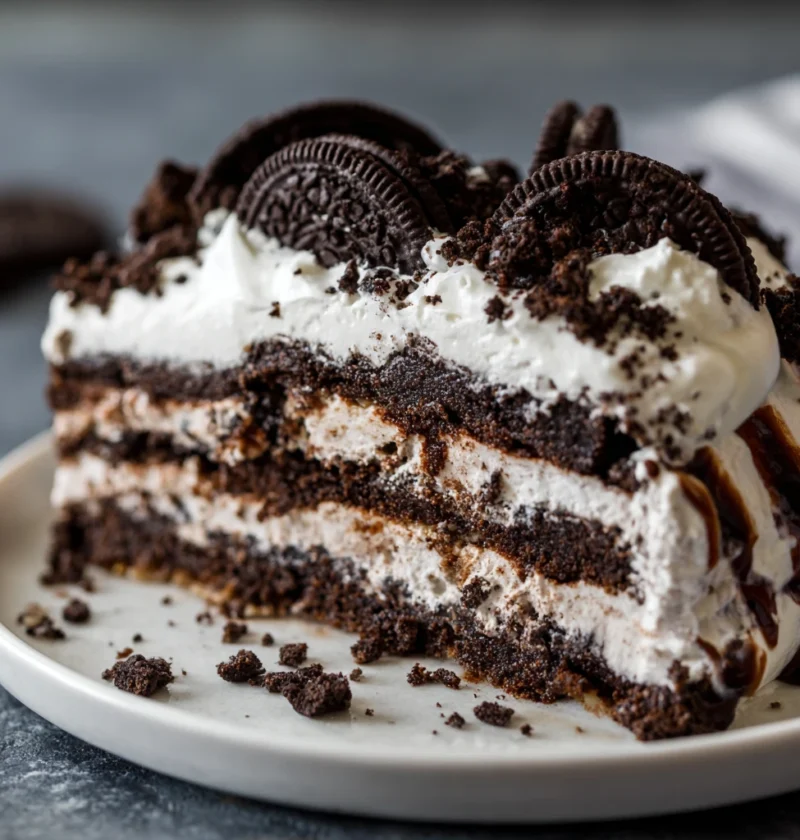
Oreo IceBox Cake
A decadent and irresistible no-bake dessert that combines the iconic flavors of Oreo cookies with a creamy, heavenly filling. This Oreo IceBox Cake is easy to make, customizable, and perfect for satisfying sweet cravings on any occasion.
Ingredients
- 1 package of Oreo cookies (regular or flavored)
- 1 1/2 cups of cold milk
- 1 package of instant vanilla pudding mix
- 2 cups of whipped cream
- Chocolate sauce, sprinkles, or additional Oreo cookies for garnish
Directions
-
In a mixing bowl, combine the cold milk and instant vanilla pudding mix. Whisk until thickened, then fold in the whipped cream to create a smooth filling.
-
Crush the Oreo cookies into coarse crumbs using a food processor or a sealed plastic bag.
-
Start assembling the cake by layering the pudding and cream mixture, and crushed Oreo cookies in a casserole dish or cake pan.
-
Continue layering until the top, ensuring the final layer is the pudding mixture. Smooth out the top with a spatula.
-
Cover the dish with plastic wrap and refrigerate for at least 4 hours to set.
-
Garnish with chocolate sauce, cookie crumbs, or whole Oreo cookies before serving.